Spine. Every second person whose activities are related to the gaming industry has probably heard this name. This is one of the most popular programs in the world of 2D animation. It has many exciting tools with which you can implement many incredible ideas. We will look at the Spine tools in more detail because they are worth paying attention to. And before that, it is worth carefully researching the preparation of the character for import into Spine from Photoshop because it is here, knowing some details, that the animator can save a lot of time in his work. And how to keep this time and protect nerve cells – we will consider this in this article.
Preparing a file for animation
Is the most uncomplicated process in an animator’s work. Yes, it is easy, considering that developers are constantly trying to make it easier for animators by creating various scripts that help export with just one click. To begin with, a Photoshop to Spine script makes exporting from Photoshop much more accessible. Thanks to it, you can save each cut image separately and spend time creating a composition in Spine. It can help import an already assembled character skeleton by remembering the position of each sprite.
But before getting acquainted with the advantages of the script in detail, it will be essential to consider some elements. When preparing the file for animation, please pay attention to the layers, namely, whether they have any extra pixels you may have accidentally made while overdrawing. This is very easy to check by clicking command+t on Mac/ctrl+t on Windows. Thanks to this command, Photoshop will select the working area of this layer, and you will be able to see and remove the extra pixels.
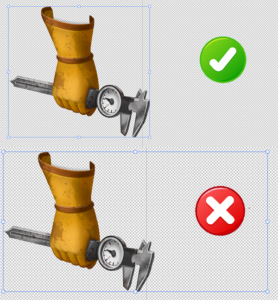
The absence of extra pixels
It is essential. Of course, they can be removed in Spine with the mesh tool, in simple words – cut so that they do not interfere with animation. However, there are better scenarios than this. Such sprites will still take up more space, and if there are too many of them, the export files will increase because the atlas will become too large. So, on the contrary, we have to save the space of Spine export files so as not to overload the game. Also, before exporting, you should carefully examine the layers you plan to ship. Avoid having the same layer names because the script will need to give each of them a unique name in the future. Be sure to pay attention to additional layer settings and clipping masks. If they exist, remove them because the layers must be the default for a complete and successful export. In addition, to avoid being disappointed by a significant difference in colors after export, it is worth using the RGB mode.
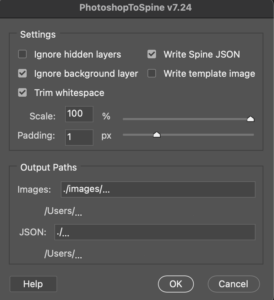
We will carefully consider what possibilities the script offers us.
Ignore hidden layers. If there is a checkmark, the script will ignore the hidden layers and will not export them. This is exceptionally convenient if you want to avoid removing specific layers in your PSD file but do not see the need to use them in Spine.
Write Spine JSON. This is the most interesting. The script will create a JSON file with the assembled skeleton, which can be easily imported into Spine. The skeleton image hierarchy will be identical to how you set it up in Photoshop. Thus, you can save time and effort creating the necessary composition for animation separately and even more on setting up the correct draw order. All you need to do is click Import Data and choose the desired JSON.
Ignore the background layer. This function ignores the background layer in your PSD file. Usually, it is used in Photoshop for comfortable drawing, but in animation, it is only sometimes needed, so the function is quite helpful.
Write template image. The script will create an additional frame image with all layers enabled, commonly used for easier positioning in Spine. This will be useful if you want to avoid generating JSON and place all the photos manually. The frame image, in this case, will serve as a reference.
Trim whitespace. The script will automatically trim the transparent pixels around each image. If the function is not active, each layer will have the canvas size.
Scale. Adjusts the hierarchy of layers before exporting. Functional when the scale of the images in the PSD file is too large to use in Spine, and you want to adjust it. This way, when preparing the PSD file for animation, you can handle the size of your PSD file. You can use the one you need. If, at the output, your PSD turns out to be too large, you do not need to adjust it further for export. You can use the scale function.
Padding. Adjusts the number of empty pixels around sprites. They can be artificially added or, conversely, reduced. Useful when you want to add or reduce open space around spirits to make them easier to animate.
Output Paths. Paths where the script will create a folder with images and a JSON file if needed.
In conclusion, knowing all the above export details will make this process much easier for you so that you can pay much more attention to the animation process itself. And this moment cannot but comfort. So, make your workflow easier, look for life hacks, and love animation!
author Kodatska Maria