In one of the previous articles, we paid significant attention to the advantages of game customization techniques. They explained why this makes players get attached to the game and feel like an actual creator of an exciting reincarnation story. It’s time to look into where the magical process of setting up customization techniques and animating characters takes place – in the animator’s workshop.
There are quite a lot of programs for the animation of 2D characters, and each of them has its features and differences. However, when we look at the situation in terms of in-game customization, Spine is a perfect choice. It not only allows you to use one skeleton for different variations of the character but also has a significantly more straightforward interface, unlike existing analogs. This feature for customizing various character variations is called the Skins tool.
The essence of the Skins
The tool uses one skeleton and animations for different characters with different body proportions or one character with different sets of clothes, hairstyles, shoes, etc. Each skin can have its unique images, bones, and constraints. Identical in shape and size, skins that differ only in color can have the same mesh (linked mesh), which allows you not to pay attention to each skin individually. Instead, one is usually configured, and the others automatically take over all its settings.
The linked mesh
The tool is essential because it saves a lot of time. To begin with, let’s recall that the concept of mesh in computer graphics is a collection of faces or vertices that start the shape of a particular object. It is worth pointing out that the linked grid uses the same grid for the same images, which are identical in form, instead of differing only in color, the presence of additional elements.
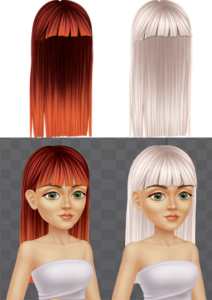
For a detailed review, let’s use two hairstyles of the same shape and create two different skins for them.
Now let’s create a mesh hairstyle for the first skin. Remember that the mesh must be thought out in advance. Avoid too many points. Instead, try to detail where a bend is a little more. This will be needed in the animation process. When creating a mesh, think about exactly how you want to use this image and how you plan to animate it. For example, if it’s the back of the hair that only serves as “lining” and is barely visible behind the shoulders and clothes, it doesn’t make sense to make the mesh too detailed. The mesh is necessary for this part to tie it to the bones in the future. For example, usually when creating pseudo 3D, the back part of the hairstyle, like all its other parts, is also tied to the bones, so the face turn is natural and looks realistic. Here, it is necessary to think in advance about the practicality of specific points in the mesh. Otherwise, too many points in the Spine project can overload the game with a lot of space, overloading it. So, after creating the mesh, we should bind it to the bones, then check the weights and ensure that we are satisfied with the bones’ influence on specific points of the mesh. Adjust if necessary and start creating a miracle. Now it’s time to make the linked mesh in two different ways. Each animator should choose the one that suits him best.
Two ways to create a linked mesh
1. Click on the mesh that we want to duplicate. From the bottom, select “Create-linked mesh.” In the hierarchy, we can see that a duplicate has been created. It is already automatically bound to the same slot in the hierarchy as its parent mesh. We click on the skin FOR which we need this duplicated mesh and drag it to the skin placeholder – with the icon of orange shoulders. So these skins have the same grids. Now it remains only to change the image in the desired skin. To do this quickly and without unnecessary complications, we indicate the path where our vision is located and its name in the attachment, separating them with a slash “/.” Chosen and done! The second skin adopted the grid of the previous one, remembered the influence of the bones, and behaved in animations similar to the parent skin.
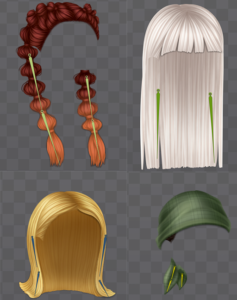
2. Select an entire hairstyle skin, and duplicate it. When dubbing, check the “Linked meshes” box, giving the new skin its unique name. In the hierarchy, in the same way, as in the previous method, we change the name of the attachments to those necessary. In the example considered in this article, we duplicate a skin with a blond hairstyle and name the new duplicated skin, for instance, hair-red. Instead of attachments of blond hair, enter the name of branches of red hair. And voila! Linked mesh is applied. However, if you do not check Linked meshes, the new skin will not inherit it. So be careful.
Both methods are quick to implement, but each animator uses their own, and they work perfectly. Remember that we can bind bones to skins that belong only to them. This tool is called Add to Skin. The image shows exactly how it looks after implementation. We highlight the bones we want to bind to particular skin and press Add to Skin. This helps significantly in the animation process. When animating a specific hairstyle, you will see only those bones to which it is attached. Instead, you will be able to avoid getting confused in many bones. The bones can be repainted in any color for a more comfortable animation process.
Here we have considered such interesting tools as Skins and Linked Mesh and quick life hacks for working with them. Now you can use this knowledge to customize any character and make the player feel like a natural fashion stylist. Use life hacks and love animation!
author Kodatska Maria