Animation is one of the critical components in the development of any game. Without high-quality animation, the game will always lack “aliveness,” charm, and dynamics, and at the same time, with it, the player can stay in the game much longer because we are all attracted by the unique movements of the characters, sound effects, etc. However, very often, novice animators, and sometimes even experienced animators, make mistakes that spoil the overall impression of the animation and sometimes complicate and significantly lengthen the work. However, making mistakes is okay because each of us makes them, and they give us invaluable experience. However, let’s consider them in more detail.
Poor quality horn
Quite often, beginner animators make two mistakes here – they make a too-detailed horn with many extra bones or vice versa – it is not detailed enough. The bones and the horn as a whole must be thought out in advance. For example, a hairpin does not need to create an additional bone. The exception is if you plan to use it in the animation – for example, the character will remove it from the hair. If it simply serves as an element of decoration on the hair, tie it to the prominent bone of the hair. This is a relatively simple rule, but only some follow it. You can continue here for a long time because the topic of the horn for the character is very vast. It should be examined in more detail in a separate article.
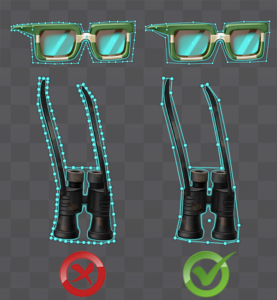
Too detailed mesh
This is one of the most common mistakes animators make. Often, beginners must pay more attention to the mesh without thinking it through. Instead, they make too many vertices, which significantly complicates the animation process because, depending on the situation, each of these vertices must be assigned the influence of bones, or each must be deformed in the animation process takes a lot of time. We have already discussed the mesh issue in more detail in the previous article, but it is worth reminding you that there is no clear and direct rule for creating a mesh for this or that object. It all depends on how exactly you plan to animate this object. It is important to remember that the most detailed mesh / the highest number of vertices will have the part with folds (elbow on the blouse, curl of hair, etc.)
Hierarchy
It is worth following her. After finishing work on the project, unnecessary slots, attachments, etc., are often kept. And sometimes, some places remain unlinked to bones. It is necessary to remove unnecessary empty spaces because our task is to make high-quality animation and follow the order in the hierarchy.
Constraints
The spine has three types of conditions- Path/Transform/IK. Often, animators neglect them because sometimes it is easier to achieve the desired effect in other ways. However, why pay more attention to the constraints from the start and save yourself considerable time in the future? The only point is that they should be used sparingly because they significantly affect the weight of the export files.
Principles of animation
Adhering to the cherished 12 principles of spirit is not just excellent but very necessary because without knowing and not using them, the character will look “lifeless,” and the effects will be “boring.” We will not consider the principles in detail because this topic deserves more attention, but we will try to use them until this process becomes automatic.
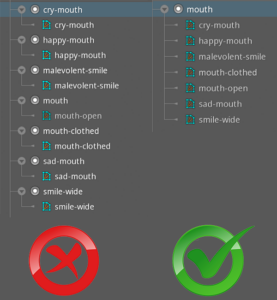
Slots and attachments
If you have multiple sprites for a specific body part, placing them in different slots doesn’t make sense. Instead, move them to one space, and then, depending on the situation, turn on the animation you need. Thus, you do not have to do extra work – look for the attachment that needs to be disabled, and only then enable the necessary one. Just click on it, and the others will automatically turn off.
Identical duplicate images
If an object in the animation repeats twice or more, it is not necessary to export both sprites to Spine. One will be enough, and in Spine, you can multiply it. Thanks to this simple rule, you can save space in the atlas, which will never hurt.
Graphs
This is quite an essential tool in animation because it can change the nature of the character’s movement – make it smoother or, if necessary, sharper. Knowing how to use graphs, you will always be able to achieve the desired effect. Pay attention to this rule and experiment.
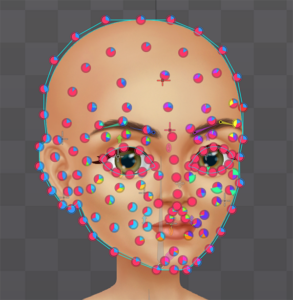
Horn of the face
Quite often, when setting up the horn for the look, animators do not take into account the fact that for the beginning to be alive and the emotions to be read as best as possible, it is necessary to pay sufficient attention to the weights of our face, namely, when creating the mesh, add vertices in the area of wrinkles, cheeks, etc. Be sure to snap the brow, lip, and eyelid bones to the face sprite and give it the effect of those bones by manually adjusting them. For example, by tying the browbones to the peaks on the forehead wrinkles, you can achieve the result of a living face. When connecting the bones of the lips to the area of the cheeks, when “smiling,” the cheeks will rise, giving the effect of a more playful smile.
References
There are many sites for finding connections. Sometimes animators don’t look at the authorities and decide to do without them, but it can give you many ideas. Some animators use their photos as references. It’s pretty simple. When you are faced with portraying a particular emotion, immerse yourself in this feeling as much as possible and take a photo or film yourself. If you don’t like this method, look for references on the Internet. In any case, they are essential.
2.5 D effect
To create such an effect, it is necessary to use the bones as much as possible, without manual deformation – with the help of a mesh. If you need, for example, to make a 2.5D face effect, try to adjust it as much as possible using weights so that you do not have to deform specific vertices during the animation process manually. In general, always try to configure everything you need as much as possible in Setup mode, and if necessary, improve details already in an Animate manner.
Root bone
It is never used in animation, should not be involved in any way, and serves only as the prominent bone of our skeleton. Your horn should always be tuned with this golden rule in mind.
Invisible pixels
We have already considered this topic in the previous article – it is necessary to carefully check during preparation in Photoshop whether there are no extra pixels in the sprites. This can be done quickly by applying an Outer Glow effect to the layer we need to test.
Friends, if you found yours among the most common mistakes in this article, don’t worry. Making mistakes is normal. Each of us has made them or still makes them. The main thing is to learn and love animation!
author Kodatska Maria